Overview
Epic Edit is not just sexy. It is also featureful.
Here's an overview of what the program can do.
Menu bar
![]()
From left to right:
 Open ROM
- Open the Super Mario Kart ROM.
Shortcut: Ctrl + O, or drag and drop a ROM file on the editor  Save ROM
- Save your modifications to the specified ROM file.
Shortcuts: Ctrl + S to save, Ctrl + Shift + S to save as 
 Import / Export track
- Import a track file, or export the current track in the MAKE (.smkc, all data) or Track Designer (.mkt, map and theme only) formats.
Shortcuts: Ctrl + I or drag and drop a track file on the editor to import a track, Ctrl + E to export a track to a file 
 Undo / Redo
- Tileset mode editing only.
Shortcuts: Ctrl + Z to undo, Ctrl + Y or Ctrl + Shift + Z to redo 
 Zoom in / out
- On the current track.
Shortcuts: Ctrl +/- or Ctrl + mouse wheel, Ctrl + 0 to reset  Full-screen mode
- Shortcut: F11
 Color palette editor
- Modify the color palettes of each track theme.
 Background editor
- Modify the background of each track theme.
 Game settings
- Modify track and driver names, ranking points, and the probability to get each item.
 Codec
Codec- Manually compress / decompress data into / from the ROM.
- ? / About
- About the editor.
- (X,Y) Coordinates
- The current X and Y coordinates of the mouse cursor over the track map.
Tileset
The tileset editing mode, which is the first tab on the right-hand panel, lets you edit the map of the selected track.
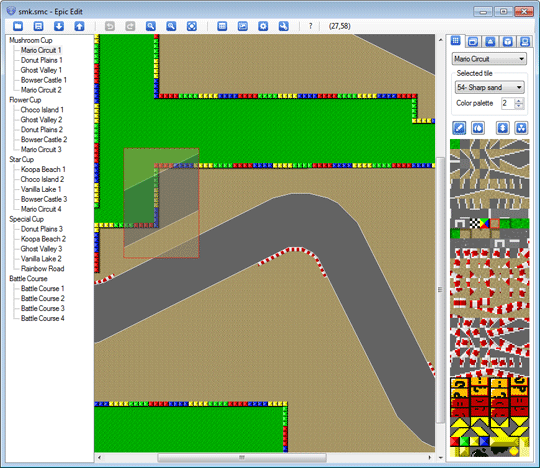
At any given time, the "tile clipboard" is filled with one or more map tiles. Left click the track map to change the hovered tile(s) with the tile(s) from the clipboard. Right click the map to retrieve the hovered tile(s) and put them in the tile clipboard. Hold right click to select multiple tiles, then release the right click button, and left click the map to paste these tiles. You can also select a certain tile from the tileset of the current track theme, on the panel on the right.
Among the other features of the tileset editing mode, available from the right panel:
- Changing the current track theme (for example, changing a Mario Circuit track into a Koopa Beach track). This will change the aspect of all of the tiles, as well as their type, among other things (the track music, color palettes, and background will also be changed).
- Changing the type of each tile (for example, making a ground tile behave like a deep water tile), as well as the color palette used by the tile.
- Changing the tileset graphics, by exporting the tileset as an image, modifying it, then reimporting it.
- Resetting the track map (using the selected tile).
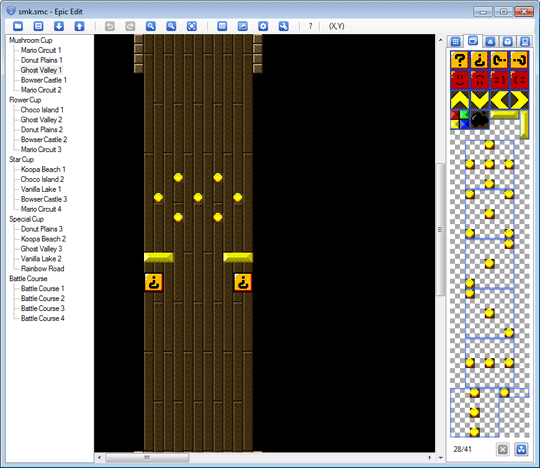
Overlay
Overlay tiles are group of tiles that are laid on top of the track map (technically, they replace the tiles they're laid over). They're used for item blocks, coins, speed arrows, and a few other types of tiles. Note that overlay tiles do not appear in Time Trial mode (because you wouldn't want item blocks in Time Trial, for example, as they'd add a random side to a skill challenge).
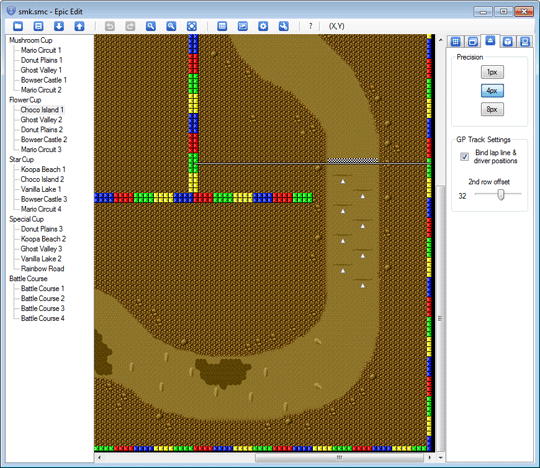
Starting positions
Edit the location and length of the lap line, as well as the position of the 8 drivers. The 8 driver positions are split into 2 rows of 4 drivers. You can tweak the offset of the the second row, to make it closer or farther from the first row. Battle tracks contain 2 independent driver starting positions (for Player 1 and 2), and no lap line.
Objects
Each GP track has objects on it, unlike battle tracks. For each track, you can pick one object type (such as pipes, fishes, moles, plants, etc). Every track has 16 regular track objects, as well as 6 extra objects which only appear in Match Race mode (Player 1 vs Player 2 course), for a total of 22 objects. Match Race objects are usually "Chain Chomps" (black round thingy on the screenshot below), but can also be bananas (as on Vanilla Lake 2 in the original game). You can toggle the type of a Match Race object by right clicking it, and choose between horizontally-moving chomp, vertically-moving chomp, and banana.
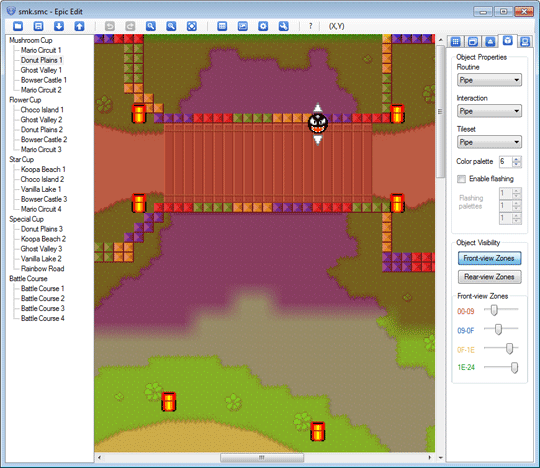
Track objects are divided into 4 groups of 4, which are displayed as color zones in Epic Edit (red, blue, yellow and green). Due to technical limitations, at any given time, a player can only see objects from a given zone. To be able to see and interact with the objects from zone 1, the player has to be in zone 1, and so on.
The shape of the object zones depends on the AI of the track. Using the sliders on the right panel, you can change the size of each object zone. Also, objects zones are divided into "front-view zones" and "rear-view zones", so as to optimize the visibility of objects whether the player is looking at things in front of him or behind him (or "her", whatever, okay? Stop interrupting me). The rear view is available in single player mode (when playing the game, press X or Select to toggle the bottom screen from map view to rear view).
Epic Edit extends the original game to give you a finer control over object settings. This enables you to pick different objects for each track, as well as pick the object routine (how it moves), interaction (what happens when you touch it) and tileset (its appearence) independently, among other things. For example, this lets you have fishes that act like thwomps and grab you like moles when you touch them.
Paths (AI)
The top part of the AI tab lets you define which item probability set should be used for this track (out of 7), enabling you to control the odds for players to get each item. Note that there are known issues with some track and item probability set combinations, which will break track object behavior. If you find out you can't interact with track objects (such as pipes) and can drive through them, then try changing the item probabilty set for this track.
The bottom part is related to the AI path. Each track has path data, that dictates where computer-controlled drivers go. This data is also used by Lakitu (that little guy on the cloud), to determine whether you're on the wrong way, or to fish you back on track.
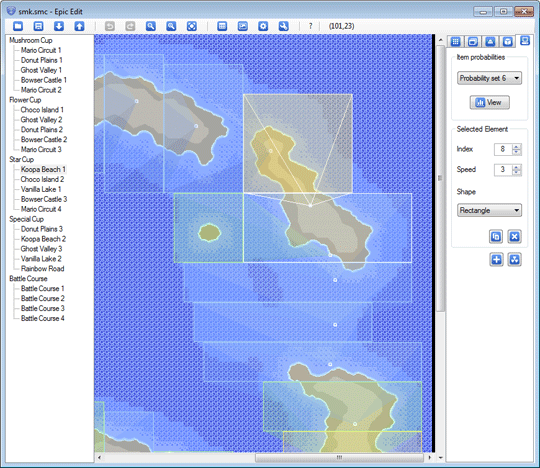
Paths are made up of elements that can have different shapes (rectangle or triangle), and that contain a "target" (a point which leads to another element). When a CPU driver enters one of these path elements, he'll drive toward the element target, then enter another element, and drive toward that other element's target, and so on. Elements also have a speed value, which defines how fast CPU drivers will be when driving over this element.
Lastly, elements have an index value, which determines their position among the other elements. For the track to work as expected, it is necessary to make sure all elements are in the right order. That is to say that right after the lap line, there should be a first element with an index value of 0, followed by another element with an index of 1, etc. Otherwise, the game will show an erroneous value for the player driver positions among the other drivers (ie: you could show up as being first while being last, or vice versa). Also note that it is possible to create multiple paths on a track (ie: a branched route), but there is one rule that should be followed: each path must have the exact same amount of elements, or else, you'll also get invalid driver position values when playing the game.
Color palette editor
Bringing up the color palette editor lets you modify all of the colors visible as you race through the game circuits. Each track theme contains 16 color palettes, and each palette contains 16 colors (with the exception of the first color of each palette, which is either used as the transparent color, or shared across all palettes). As the color palette editor is open, you can click on any graphics to select the color you're on, then modify it. Note that some of the in-track graphics are not visible within Epic Edit, such as driver sprites. These will take a bit more efforts to edit, as you'll need to know which colors to edit without being able to simply click on graphics to grab the wanted colors. About driver palettes, they are from palette 9 to 12.

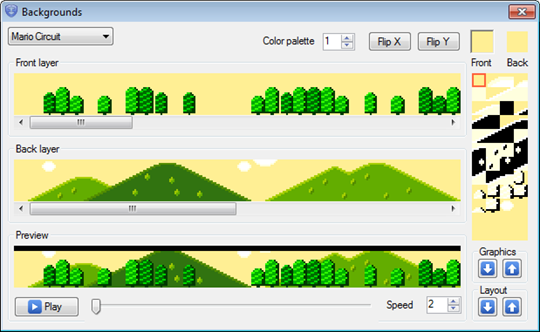
Background editor
This editor lets you view and edit the back and front layers that make up the track backgrounds. It also lets you preview the way the background will look in game. Background tiles work differently from road tiles, as you can freely change the color palette of each tile you lay, that is to say the palettes are not tied to the tileset. You can also flip each tile horizontally or vertically, and modify the graphics and colors of each tile.
Game settings
The Game settings window contains 4 tabs:
- Cups & Themes
- This lets you edit cup and theme texts.
- Track names
- This lets you select the wanted name for each track. Each name is composed of a theme name followed by a suffix.
- Results
- This lets you define how many points drivers get depending on their position at the end of each race, as well as edit the driver names.
- Item probabilities
- This lets you tweak the odds of getting each item, depending on the game mode and the player position. Each track is linked to an item probability set, which can be changed from the AI tab.
Codec
This is for advanced users. This lets you modify compressed data otherwise not editable with Epic Edit, by decompressing them, modifying them with another tool (such as Tile Molester for graphics, or a hexadecimal editor), then recompressing them into the ROM. See the SMK ROM documentation for known Super Mario Kart ROM addresses.
Say you want to modify the Monty Mole sprite. Epic Edit doesn't let you do that easily. Don't you just want your money back? Anyway, I'll explain the basics without going into too much detail (because as I said, this is for advanced users, and also because I'm lazy). Open the Codec tool. The default address ("At") is 0, or 200 if your ROM is headered. Set the address to 5D6 (which is the address to the Monty Mole graphics that you can find from the SMK ROM documentation above), or 7D6 if your ROM is headered (as you need to account for the header length, ie: 200 + 5D6).
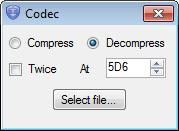
Don't check the "Twice" box, because this data is only compressed once. Make sure "Decompress" is checked, then select a target file. Open the resulting file with Tile Molester. If you want to see the actual in-game colors before modifying the graphics, you'll need to import the wanted colors palettes. To do that, use your SNES emulator to take a save state within any Donut Plains track (because that's where the Monty Moles are from), then import it into Tile Molester (Palette > Import From > Another File...). Once you're done modifying the file with Tile Molester, just resave it then recompress it with Epic Edit at the same address.